Lentil Me This

Image

Right.  So.  I just got my bill for the renewal of my domain name and web hosting space.  It reminded me that it’s been two years since I first started this project.  (It has also served as a tangible reminder that maintaining my blog does in fact require a small financial investment!)   I felt a pang of disappointed because when I started stickafourchetteinit two years ago, I was overflowing with enthusiasm, energy and ideas, and I never got the content off and running as I’d hoped.  And maybe I won’t this time either, but I’m giving it another go, because, well, why the stickafo not.

It’s summer – in a BIG way.  The temperatures have consistently been in the 90s, the cicadas are out singing and the rosé spends 20 pre-open minutes in the freezer to get the just the right chill.  This all obviously leads our collective culinary penchants to converge on a common subjet… SALAD!  As a compliment to a BBQ, or as a main dish on its own, the summer salad offers endless possibilities for cold fresh food!  And who doesn’t love cold and fresh in this heat!?

So – here’s a recipe for a hearty, flavorful and filling lentil salad that I’ve used both as a side and as a main dish.  Cooking the lentils does require some heat – I usually do them in the evening.  I don’t serve this salad totally cold – if I make it made ahead of time, I remove it from the fridge about an hour before serving.

Crunchy Lentil Salad

A totally not boring way to love a lentil.

Crunchy Lentil Salad

1 cup green lentils

5 cups water

1 bay leaf

1 stock of celery finely chopped

1 medium/large carrot finely chopped

1/4 cup finely shopped red onion

2 tbsp. finely chopped parsley

1/4 cup olive oil

2 tbsp. lemon juice

1 garlic clove pressed

1/4 teaspoon dried thyme

1/4 teaspoon ground cumin

Salt and freshly ground black pepper

Cook the lentils in the 5 cups of water (with the bay leaf) for about 15 minutes – they should still be crunchy.  While the lentils are cooking chop the carrot, celery, onion and parsley. Drain the lentils (I allow them to sit in the colander for a couple of minutes) and remove the bay leaf. Transfer the cooked lentils to a serving bowl, add chopped veggies and mix well.

Make the dressing by mixing together the olive oil, lemon juice, spices and pressed garlic clove.  Add salt and pepper to taste. Pour dressing into the lentils/veggies and mix all together. 

Serve slightly chilled in summer, at room temperature in colder months.

Stick A Fourchette In It – ‘Cause You’re Done!

MaDus

Image

I can only call these this Magic Dumplings (MaDu for short – who ‘members TomKat?!) , because I have NEVER in my life seen The Main Man put anything resembling cooked cabbage ANYWHERE NEAR his gastrointestinal tract.  And holy bejezus he asked for more. And the kids ate them?!  So I can only deduce that the combination of the ingredients somehow turns into magic powder and makes them all agree to eat cooked veggies and quinoa.  For reals people.

This is super easy, but does take a bit of time (mostly the rolling of the wrappers).  Helpers can be enlisted (see photos).

This makes a nice finger food as an apéritif.  Or combined with salad, a dinner.

Not gonna lie, the wrappers were a daunting enterprise; but totally easy and worth the extra time.

Magic Dumplings (MaDus)

Dumplings

2 cups flour (for gluten free people just use gluten free flour!)

3/4 cup just boiled water.

That’s it!!!

Measure the flour into a medium to large bowl and make a hole in the center.  Boil the water, and when it reaches a rolling boil, remove from heat and let rest about 2 min.  Add the just boiled water to the hole and mix the flour with the water – I find a wooden spoon works best.  When the water is absorbed into the flour go at it with your hands (careful, the water is still a bit hot) until you get a “ball” that seems mostly uniform.

On a lightly floured surface work the dough for about 2-4 min, I use the heal of my hand until the end when I use my whole hand and fingers.  When the dough seems fully combined and easy to handle place in a plastic bag for about an hour (or longer – the time is not such a big deal).

Ball of dough ready to be placed in plastic bag

Ball of dough- plastic bag ready!

Filling

1 white or yellow onion

1 large stock celery

1 carrot (optional)

1 cup-ish or so of packed cabbage leaves

2-3 garlic cloves (depending on how garlic-y you’re feeling)

1/2 cup cooked quinoa

1/2 cup frozen peas

1 tablespoon tamari

1 drizzle toasted sesame oil

While your dumplings are plastic-bagging, start the quinoa.

Put the onion, celery, carrot, and cabbage in the food processor to chop everything into small pieces.  Heat a heavy sauté pan on medium heat and add the onion/celery/carrot/cabbage mixture.  When the veggies start to cook (about 3 min) mince the garlic and add to cooking veggies.  Let everything cook together for about 10 minutes, being careful not to burn.  The quinoa should now be finished, so add that to your veggie garlic mix, and add the frozen peas too.  Cook everything for another 5 min or so, and add the tamari and the drizzle of toasted sesame oil.  Careful, the sesame oil is strong, do little bits at a time and taste until you feel like you’ve reached optimal taste.  Then set the filling aside.

MaDu Filling

MaDu Filling

Back to the wrappers:

When you are ready to roll the wrappers, using a lightly floured surface, break the dough into 20 or so pieces and roll into flat circles with a rolling pin.  If you’re using regular flour, they are quite stretchy and after rolling, you can continue stretching with your hands to make the wrappers thinner.  I stack them, adding bit of flour between each wrapper.  DON’T don’t try stacking if it’s too hot – they tend to stick together – ask me how I know!

Big ball broken into little balls

Ready to roll.

Sweet Yummy, rolling and stacking

Sweet Yummy rolling and stacking

Now it’s time to fill.  Place filling (about a tablespoon I think) in the center of the wrapper and fold the wrapper in half.  Use your fingers to “seal” the two halves together and pinch all around the edge to keep the filling from coming out.  Put all the ready to cook dumplings on a plate until you’ve done them all.

Ready to cook!

Ready to cook!

Now cook!  With a thin sheet of oil (I used olive) in a heavy sauté pan (I use the same pan I used for the filling, but I wipe it out with a paper towel first) over medium heat, make one layer of dumplings.  Allow the dumplings to cook on one side for about 3-5 min (you’re looking for a golden brown color).  When one side is cooked, add a 1/4 cup water to the hot sauté pan and cover with a lid (careful – lots of steam).  Let the dumplings steam for about 3-5 min and remove cooked dumplings to a bowl that you can cover with a towel to keep warm while you do the next batch.  Before beginning next batch empty sauté pan so there is no leftover water.  Re-oil with a thin sheet and repeat until you’ve cooked all the dumplings.

Serve while warm!  They are a bit sticky, so don’t hesitate to serve with tamari/soy sauce or a mixture of tamari, lime and a bit of sesame oil.

It’s magic.  Or maybe it’s salt.

Dinner is served!

Dinner is served!


Quick as Brunch Scall-yinz Pancakes

Image

Brunch: the green light meal on the weekend to mix and match anything you want to eat in one meal without worrying about the service order.  Pain-au-chocolat treat with an espresso to start, sure that makes sense, because it’s basically breakfast.  Followed immediately by cheese “en aperitif”,  then a green salad with carrot ginger dressing.  Why, yes, totally ok, we’re now at lunch!  And maybe a coupe of champagne during the meal, because hey, this is brunch, so why the f not!

If I ever get back to posting regularly, there will be a lot of brunch entries, because it’s easily my favorite meal to prepare and to eat.

So here’s a good one to start: Savory Scallion Pancakes.  Totally easy, totally fast, and a big hit among kids and adults alike.  As a lil’ shout-out to my Pittsburgher sister and her fam, I’ll call them Savory Scall-yinz Pancakes.  Because yinz is gonna like ’em.

I also have to admit that I snagged this recipe from Gwyneth’s cookbook (don’t judge me), and actually didn’t tweak it much because it’s pretty good as is.

Fry for about 3 minutes on each side

Fry for about 3 minutes on each side

Drizzle with some tamari !

Drizzle with some tamari !


Savory Scall-yinz Pancakes

1 cup spelt flour

1/4 cup brown rice flour

1 1/4 cups ice water

1 tablespoon grilled sesame seed oil

1 to 1 1/2 cups of thinly sliced scallions

Pinch of sea salt

Oil for frying (I’ve used canola and olive… the canola seems to turn out the best pancakes)

In a large bowl combine the flours and the ice water and whisk to get a nice looking batter with no lumps.  Add the sesame seed oil and incorporate the scallions.

Heat a large pan for frying and cover the bottom lightly with a layer of cooking oil.  I use my iron pan for this and it’s the bomb (even if I don’t have the Eiffel Tower handle version).  Really, totally and completely worth the investment.

There are a couple of ways to fry these babies.  I tend to make smaller pancakes as opposed to one big pancake for each person.  I find most people have a hard time committing to “bigger”, and experiment more easily with little portions.  And let’s be honest, it takes a leap of faith to accept pancakes based around something from the onion family.  I use my 1/4 measuring cup and make batches of 3 small pancakes at a time, frying lightly on each side for 2-5 minutes depending on the heat of the pan. Between each batch I add a bit more oil so the bottom of the pan is covered very lightly.

Sprinkle with some salt, or drizzle with a bit of tamari and serve warm!

Stick a Fourchette in It, ‘Cause You’re Done!


Inception Stock (Veggie)

Image

Much of my inspiration for recipes comes from the couple of cook books I’ve purchased (or have been gifted), and loooots comes from the internet.  Or as we tech savvy people call it, the World Wide Web.

I’m constantly amazed by the sheer amounts of information available on this W.W.W. in the tap of a few keys.  I often find myself doing searches on a particular ingredient, or ingredients, and going through recipes until I find one that:

  • A) sounds good
  • B) isn’t too processed foodie
  • C) doesn’t take three days to make
  • D) contains things I either have in the pantry/fridge, or can substitute for easily enough.

Most of the time within about 5 recipes I stumble onto something. 

One thing however that particularly irks me when vetting a recipe is when doing the mental check for ingredients: “check, check, check, yes, YES AND YES : BOOYA, this is totally happening tonight !”,

only to stumble on the buzz killer:

2 cups (insert ingredient), SEE PAGE 67.

This is bad news.  If ingredient called for on PAGE 67 is included on ANOTHER PAGE, usually because it needs ANOTHER PAGE to explain how to make it.  That’s where we hide recipes that actually do take three days and more often than not involve various cooking processes that can’t be done in a scrape-it-together weeknight meal: blanching, freezing, chilling, simmer for 45 minutes, etc.

I feel like this technique should be called inception recipe-ing, and I also feel like it should not be allowed.  Because unlike for Ellen and Leo, time does not actually move more slowly when we’re a layer in.  The “let soak overnight” actually does take THE WHOLE NIGHT.  45 minutes of unanticipated prep work, will take that, and probably more (enter whiny children, a phone call or two, an annoying work email,  and other minor distractions).

The point of all of this: I scoffed and scoffed until I realized that I was planning to post a recipe… that…. wait for it….calls for the stock made on page 67.  So I’m going to talk to you about inception stock, but I’m also going to give you the solution so that it really is inception stock: when you get to the second layer, you’ll bend the time/space continuum.

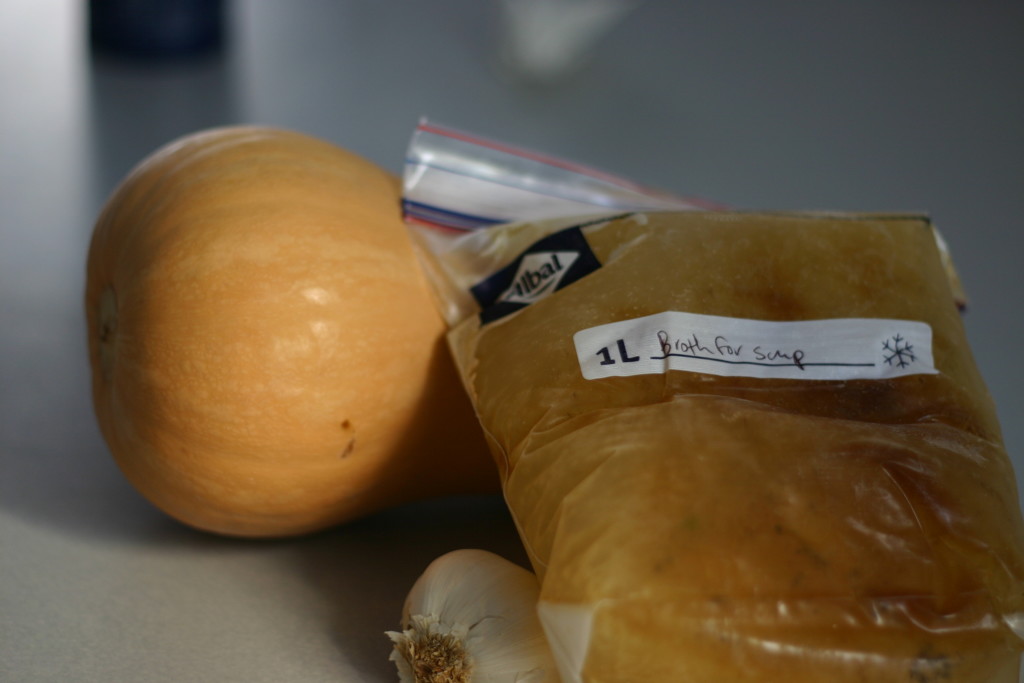
Freeze it!  Like in the freezer!  Make it on the weekend, pop in freezer bags and you’ve just layered in to save a good hour.  My editor Nini totally crinkled her nose at this idea.  “No way” she said.  “Trop compliqué.”  And I think she turned around and actually walked away.  I totally understand this response, and once upon a time would have thought the same thing. 

But really, try it – just once.  Make this on a weekend, when you have an hour around the house and you can get this going in the background: read your book, watch a movie, do housework, go for a run and have someone else keep an eye on the goods.  Make yourself freeze a couple of ziplocks and email me when you use this on a crazy Tuesday night to put together a quick as lightning soup. 

It’s easy.  And so much healthier than the industrialized veggie cubes that are a quick fix for flavoring  soups, sauteed veggies, pasta, etc.

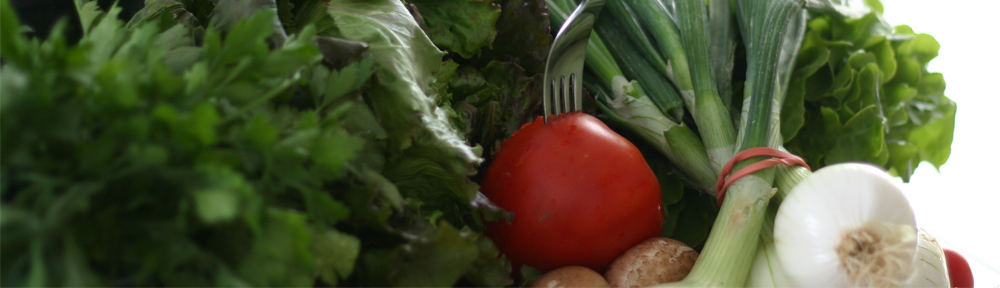
This actually works with any number of combination of veggies and herbs.  Choose the ones you like best!

Inception Stock

Just incepted an hour of prep time!


Inception Stock

12 cups of water

1 medium to large carrot, peeled and chopped into large chunks

1 large onion, peeled and cut into large quarters

1 stalk celery including the leaves, chopped into large chunks

2 cloves of garlic peeled crushed open (like with the side of a knife) but not minced

1 handful parsley leaves roughly chopped

1 bay leaf

Sometimes I add a handful of cilantro leaves if I have them on hand

I’ve also been known to add some kale leaves.

1 teaspoon large sea salt

1 teaspoon freshly ground pepper

Once your veggies are peeled, rinsed and chopped, add everything to a large pot.  Bring to a rolling boil, stir everything and turn back the heat to simmer for 45 minutes to an hour.  I usually cover the pot at this point and cut back the heat to low, just to maintain the simmer.  This is when you can go back to your book, take a nap, do some housework, go for a run, etc.

After an hour or so, remove from heat.  Let cool and strain the liquid.  For the remaining solids, sometimes the kids will eat the carrots and cooked onion as they come out of the pot.  I’ve also been known to throw all the solids in the blender to make a purée that I can sneak into mashed potatoes or pasta.  (The purée itself isn’t great, but when combined can add some nice flavor.)

Then distribute the liquid into ziplock bags, usually about 4 cups of stock per bag.  A nice trick I learned here: freeze the liquid flat in the bag and it defrosts much more quickly.  (Total aside: do we say more quickly or quicker?  Popular opinion on the internet seems to be divided!)

I shall now consider that I can make guilt-free reference to this recipe in other recipes in the near and far future.  You have been warned!

You Can’t Stick a Fourchette in This One (obviously!), but You’re Done!


Goes Down Smoothie

Image

Navigating the ins and outs of healthy eating with kids is tricky.  It’s hard to explain to a 7 year old exactly why some of the foodstuff she loves are totally ok: apples, grapes, tomatoes, salad, lentils etc. but others, like Coke, are total shit.  “But Moooooooom, it tastes SO good, and I feel FINE after I drink it.  Really, I don’t think it’s so bad for me, I don’t even feel sick!” 

To try and clarify which things are which,  we use two categories for things we like: “tastes good /good for you” and “tastes good /not so good for you”.  The latter category is reserved for treats and exceptions and the former is mostly open bar (sadly, the real bar beverages fall into the tastes good/not so good for you category, so no open bar at the real bar. Grrrrrrrrr.)

So.  Fruit juice.  An alternative to soda, more fun than water… many people categorize this as a tastes good/good for you option.  This would be seem to be a logical conclusion because it’s derived from fruit, a real, whole food.  I’m not convinced; here’s the low down.

Lots of fruit juice is loaded with extra sugar, and other additives to preserve its shelf life at the grocery store.  Often the extra sugar is added in the form of high fructose corn syrup.  And just to no that.  But even if it’s not the really evil kind of added sugar, any kind of refined sugar isn’t a good idea.

Suppose you buy 100% organic juice: totally safe, yes?  Hmmmmm, not so sure.  The 100% organic stuff is definitely better than the mega processed aforementioned kind, but it’s still processed.  While there are still some of the vitamins in the juice of the fruit, many of the other important nutrients found in the whole fruit are eliminated; fiber, for example.  And even if the sugar is naturally occurring so not technically a processed food, you can certainly drink lots more “sugar” in the juice shortcut than if you have to eat 10 oranges to get the equivalent quantity.

I don’t mean to say that juice is BAD.  But it’s not a replacement or an equivalent for whole fruits that have a natural nutrient/vitamin balance.  I don’t offer it to the kids on a regular basis. I guess I would put it in the good/not so good for you category.  That same category where I put my wine.  As much as I would like to, I can’t credibly convince myself that I’m drinking it for the grapes.

Wait, whaaaa?!  No more juice?  Little Jimmie loves juice!  He’s going to flip a lid if I cut back. 

I hear ‘ya.  Here’s a good alternative for a fruity beverage treat, because seriously, who doesn’t like a smoothie.  (Use the 2 banana version in the beginning, the extra sweetness is appreciated by the young-inz.)  And the added veggies are a bonus!  The whole Fam gets on board for this one.

IMG_0353 IMG_0354

Going Down Smoothie

4 cups raw spinach leaves

1 cup other greens (I used kale)

Cold water (as needed)

1 apple washed and chopped into large chunks

1 pear washed and chopped into large chunks

I banana, peeled

Small bunch of cilantro

Juice from one lemon

Start by making the green base: put the spinach, kale and water in the blender.  If you have a serious blender like a Vitamix, I’m totally jealous and you should invite me over to use it.  Just kidding.  Serious blender owners won’t need much water.  The rest of us have to add water and push the greens down until the mixture “takes”.  This will vary.

After you’re set on the green base, put the blender on high, and add the fruit so it mixes in with your base.  If you want to up the sweetness factor, add another banana.

Last step: the herbs (cilantro in my case) and the lemon juice are added last.

Serve cold.  Preferably in fancy glasses.  All things taste better in fancy glasses.

You Can’t Stick a Fourchette in This One (obviously!), but You’re Done!


Crazy is as Crazy Does

Image

IMG_0297IMG_0293We started the kids’ swimming class on Wednesday night, and I’d forgotten that 20+ children in any space can totally be a crazy-inducing experience, but 20+ kids in a space with an echo and full of water, can only be described as fresh hell.  I was of course running late, thus became that person who parks in the no parking zone to get the kids inside and changed on time (I’ll come move the car as soon as they’re in their class, no evil eyes pleeeeeease!) only to realize I’d forgotten Mister Mister’s trunks, and had to run barefoot back outside to aforementioned badly parked car with naked Mister Mister in my arms to find his cotton underwear (he had a diaper on because he hasn’t quite mastered the potty yet) because once he’d seen the pool, getting dressed without getting in the pool was NOT an option.  The other parents and kids who had finished the previous class and were filtering out to the parking lot mostly stared at the hot mess that was Mister Mister and I screaming and running to the car, the contents of our bag strewn across the tiny changing room…  Sweet Yummy pretended she didn’t know us and calmly went to her class.  Then Mister Mister, suited up in his cotton underwear, ran out of my arms and jumps head first into the pool.  Everyone turned around to see who the owner of the crazy kid was, and it was me, looking totally the part with various pieces of clothing and towels in my hands, dirty (now muddied) feet from running barefoot through the dirt to the car, and hair matted to my sweaty forehead.  I checked my phone, and we been at the pool for a total of 7 minutes.  

Needless to say, by the time we arrived home an hour later, I could barely string together a coherent sentence. I had to remind myself why extracurricular actives are so important: they make the monsters tired so they go to bed early, leaving the evening free for a glass (or three) of wine and Orange is the New Black episodes.they develop and hone the physical and creative skills of our youth.

Dinner turned out to be a mix of two dishes I normally have on heavy rotation, one a pasta dish, the other a rice dish.  The mix was because I literally kept forgetting which one I was making and started mixing up the recipes.

So here it is.

Cray-Cray Something

1 tbsp coconut oil

1 large onion

2 cloves garlic

1 knob fresh ginger chopped into small pieces

1 tbsp. turmeric

4 Tbsp. Tamari (additive free soy sauce – also gluten free)  I buy mine at the organic store.

250 ml (8.5 ounces) crushed or puréed tomatoes (JUST tomatoes, nothing else!  Also try organic store for this one if you have doubts)

100 ml coconut milk (careful on this one too, many brands sneak additives in to make the texture consistent.  Non-additive coconut milk has a thick layer on top and the water on the bottom.  That’s normal… equal parts of both translate nicely into the milk when you’re cooking.)

1 block fermented tofu (non GMO, and no unnecessary additives) chopped into cubes

I package Somen noodles

Bunch of cilantro

Salt and pepper to taste

Heat a saucepan on medium heat and add the coconut oil. Once oil is hot, add the chopped onion, and a few minutes later the pressed garlic and the ginger.  Let cook for 10 minutes or so, until the onions are transparent.  Then add the chopped Tofu and cook long enough to brown the sides of the Tofu (5-10 min-ish).  Then add the turmeric.

One mixture is cooked to your liking, add the sauces (tomato and coconut) and 2 tbsp of Tamari.  Let simmer while you make the Somen noodles.  These are my FAVORITE quick dinner noodles because they take THREE minutes to cook.  Literally.  In this recipe it’s even faster because you want them to be a bit al dente.  I cooked about 2.5 min for this recipe.

Cook drain noodles and add them to your saucepan and mix everything together.

Taste and check the salt… if you still need add some more Tamari (2 tbsp) or so.  Mix together so the tastes mix.

Just before serving add pepper and chop the cilantro.

Stick a Fourchette in It, ‘Cause You’re Done!


The Rentrée

Image

The rentrée (back-to-school in French) in France is kind of like New Year’s.  Stick with me, this will make sense in a minute.  For last part of July and most of August, life slows considerably in France.  Many families leave for vacation for a few weeks.  But even for those who stay put, the slower pace of life is undeniable.  (This can also be very very annoying because nothing can get done “until so-and-so is back in September”.)  As the month comes to a close, and the regular pace of life threatens to resume, there is an overall sense that people that feel rested, rejuvenated and ready to embark on the adventures September promises.  As part of this “new” feeling, I often find myself making resolutions much like for the New Year (hence the comparison).

  • I will start waking up earlier.
  • I will start running again.
  • I will start waking up early to run.
  • I will stop procrastinating.
  • I will get more sleep.
  • Etc, etc, etc

Part of my unofficial resolutions this September is: BREAKFAST!  Now that Mister Mister has started school, I want the kids to have a couple of nice minutes in the morning, eating breakfast together.  Eating a healthy, nutritious, good-for-you breakfast.  This is a big deal for me because one of my most marked personality traits is my need for sleep.  Lots and lots of it.  I’m the girl who negotiates with herself to sleep for 3 more minutes (self, it really makes no sense to get out of bed at a non-round number –  no one gets up at 7:07 you should wait until 7:10), or starts accepting totally absurd truths in order to score 15 more minutes (today I’m sure there will be no traffic, I’m going to have a naturally really good roll-out-of-bed hair day, I am going to look so well rested I probably won’t even need make-up, oh the kids are totally going to be in good moods and cooperative I can get them both ready in under 10 minutes).  This list is mostly endless.  For any French readers, I didn’t invent this concept.  She did, and I still fall on the floor every time I watch it.

So: BREAKFAST.  Two tricks: 1) plan ahead  2) make it look fun.  I asked Sweet Yummy  if she had any thoughts on the breakfast subject, and this was her suggestion which I loved.  It took less than 10 minutes.  Seriously.

Brilliant she is!

Breakfast Brochettes and Chocolate Dip

Breakfast Brochette


For the brochettes

Skewers

1 apple

1 banana

1 peach

1 pear

A few big grapes

A couple of Reine Claude Plums

For the dip

I container of goat’s milk yogurt

2 Tbsp. Cacao powder

2 Tbsp. Maple Syrup (the real kind, just the syrup, no added sugars: when in doubt, read the label).


Having the skewers on-hand is the hardest part of this recipe.  By chance, I had some  in the back of a drawer from ages ago… I’d forgotten about them, but Sweet Yummy recently came across them.  And who doesn’t love eating food off skewers!? (See rule 2)

Cut fruit (any fruit you have on hand!) into small pieces and alternate on the skewers.

I made the dip the night before (see rule 1).  Dump the yogurt into a bowl.  Add the cacao powder and the syrup and whisk vigorously to get a smooth chocolate texture.  Refrigerate until the next morning.

Now Stick a Fourchette In It, ‘Cause You’re Done!

A Word About Dairy

One of the things that changed my awareness about the kinds of “food” we eat was a book called “Sugar, Salt, Fat: How the Food Giants Hooked US by Michael Moss.

It’s an eye opening read.

One of the things that shocked me the most, was the cray cray truth about the recommendations made by the government concerning what constitutes a healthy balanced diet.  Making a long and somewhat complex story short for the purpose of the blog (but seriously, read the book for the long more complex version, it’s totally incredible – and not in the good sense), the dairy industry has long been subsidized by the US government.  Because at one time milk was considered a necessary food for the American population, the government took the dairy industry under its wing. The dairy business is not subject to the same laws of supply and demand as other markets: whatever isn’t bought by the consumer is bought by the government.  At one point there was such a surplus of dairy, the US government stored nearly 1.9 BILLION pounds of it in underground bunkers in Kansas City.  WTF?!  And these numbers are from NINETEEN EIGHTY ONE!

So then the government tried to figure out ways to better MARKET dairy so that people would consomme more.  For example: Got Milk?  Those milk mustache ads with a slew of easily recognizable celebrities and athletes.   Extra cheese everything : double stuffed crust pizza anyone?  It really was a double whammy marketing ploy,  one part of the campaign appealed to our taste-buds and sense of gustative adventure.  The other more insidious strategy was geared toward encouraging people to eat dairy in all its forms: milk, cheese, yogurt, etc for its nutritional benefits.  (And this despite the fact that these are major sources of fat in the American diet.  Which as we all know, is a problem.)

Which brings us to the question of dairy and nutrition.  Is dairy really necessary?  The tide sure is changing on what experts say about including dairy as an integral part of our diets.

Here’s what some smarty pants people at Harvard say about milk

Again, making a long story short, many experts agree that dairy isn’t necessarily bad in small quantities, but it isn’t really necessary for our diets either.  Even though it remains very ingrained in our culture.

I remember being really surprised when my second baby, Mister Mister, weaned, his pediatrician who I mostly like was pressuring me to give him what in French is called “lait de croissance”.  This essentially means growth milk, and it’s a type of vitamin fortified milk that is for children under the age of 3.  I explained that I wasn’t totally sold on the idea of cow’s milk, but what really bothered me about the “lait de croissance” were all the sugar additives.  And she said, “oh yes that’s normal, the iron fortification gives the milk a terrible metallic taste, so they add chocolate or vanilla to cover that up.”  Wait, really ?!  I’m giving my kid extra sugar so he can drink milk to help his IRON intake??  Cow’s milk is THAT omnipresent it the lives of babies and young children.

I’m not sure where I first heard/read this, I think it might have been in the documentary Forks Over Knives.  But someone said, “what other species do you know other than humans, that consume a MAJOR amount of milk and derivative products from ANOTHER species”.  And I couldn’t think of any.  And then of course there is the famous: cow’s milk is nature’s perfect food… for baby calves.  And something about that makes perfect, logical sense.  We humans probably really don’t NEED dairy all that much.  We CERTAINLY don’t need it in the quantities with which it is being produced, which has brought on a whole host of other issues that figure into the question: the health of the animals producing the milk (hello hormones and antibiotics), the humane treatment of said animals (nothing humane about it in fact), the economic and ecologic consequences of the dairy industry, to name the big ones.  But more, lots more, on this “host of other issues” at a later time.

I f’ing LOVE cheese.  A creamy bleu, a soft chèvre, or perhaps an aged comté, or all three together, paired with a glass of red wine might be one of my favorite things in the entire universe.  I still use dairy when I cook, but I also use quite a few alternatives: almond milk, rice milk, coconut milk,  olive oil, etc.  To “substitute” for cheese it all its umami, creamy goodness, I use a variety of cashew cheese/dip recipes.  Totally multifunctional, they are lovely aperitif dips for veggies, lovely spreads for breads, yummy fillers rolled up in collard greens or lettuce, thinned out with a bit of rice milk or water they can be used as sauces in pasta, rice or quinoa.   Here is one of our favorites!

Spice Cashew Cheese

I cup of cashews

1/4 cup plus a couple glugs of olive oil

1/4 cup water

1/4 tsp cumin

1/4 tsp turmeric

1/4 tsp smoked paprika

Juice from about two large juicy limes

Pinch of sea salt

Pepper to taste

For full disclosure I first ran into this recipe in Gwyneth’s cookbook (don’t judge!) It’s All Good which I’ve found to be helpful for plant-based recipe ideas (I SAID, don’t judge).

Glug the olive oil into a pan and heat to medium heat.  Dump the cashews in the heated oil in the pan and stir around a bit so the cashews get a nice coating of the olive oil.  The idea here is to roast the cashews a bit, but not too much.  While they are goldening up (it should take five minutes or so) add the spices (cumin, turmeric, smoked paprika) and mix in with the cashews.  I mix everything a lot during this stage so the spices don’t get burnt.  When they are roasted to your liking, remove from heat.

Transfer the spice-covered cashews to the food processor.  Add the lime (I don’t give exact measurements for the lime, we like it tangy, others prefer it less acidic so you really have to adapt to your personal taste), 1/4 cup olive oil, 1/4 water and mix everything together.  I usually let it mix for about a full minute and a half so that some of the cashew oils are released, this helps the creaminess of the texture…

It has a tendency to explode at the beginning, so after it’s been mixing for a full minute or so scrape down the sides of the processor.  This is when I add a pinch of sea salt and grind some pepper in.

The texture should start looking quite creamy.  You can adjust the thickness by adding more water (or rice milk) to thin the mixture out.

Stick a fourchette in it, ’cause you’re done!